Wednesday, March 27, 2013

Link!


Here's the Link I made from Becchin/Tanoushimo's pattern...how cute is he?

Where's my hat?
Okay...what happened to my feet?


Here's a few stats:

My Link is about 6.375 inches tall with out his hat.

Head circumference is 7.75 inches just above his ears.

Outer diameter of hat is 9.5 inches and is about 2.5 inches tall.

Shield is 3.5 inches long x3 inches wide.

Sword is 4 inches long.

Sheath is 2 inches long.

I followed the pattern as written, using All About Ami's suggestions for the hat.  I also used her pattern for the shield....the shield! LOL Embroidery isn't one of my strong suits, but yeesh!  I ended up having to just cut tiny triangles from yellow felt and sewing them in place.  And I felt so smart and cool.  Only to realize that I had sewn the bottom triangle on upside down. :)  See?

And now it's fixed.  Yay!
Link's disappointed that his shield is wrong.


Shield back

Reworked shield


I was going to just leave it, but Link's sad face convinced me otherwise.

I used this pattern for the sword, and I whittled down a drinking straw to put inside it.  I thought that would be a bit safer than wire to make it more sturdy.


I ended up making up my own pattern for the sheath.  I liked AAA's and would have used that, but the sword wouldn't fit in it.  So here it is:

Crochet a chain long enough to go around the sword.  I think I did 8 sc in the chain. Join into ring, and sc in a spiral until long enough to span across Link's back diagonally from shoulder to hip.  Then for the strap, sc halfway around the next round, turn, * ch 1, sc 2. turn.  Repeat *in this fashion until strap is long enough to fit around the body.  Fasten off, and leaving a long tail for sewing, sew free end to opposite end of the sheath. Weave in ends.


I've found this pattern to be really inspiring.  Like I said before...the ball jointed head changes everything!  

Tuesday, March 26, 2013

Friday, March 22, 2013

I've

just posted my 100th completed project to Ravelry...Yay!


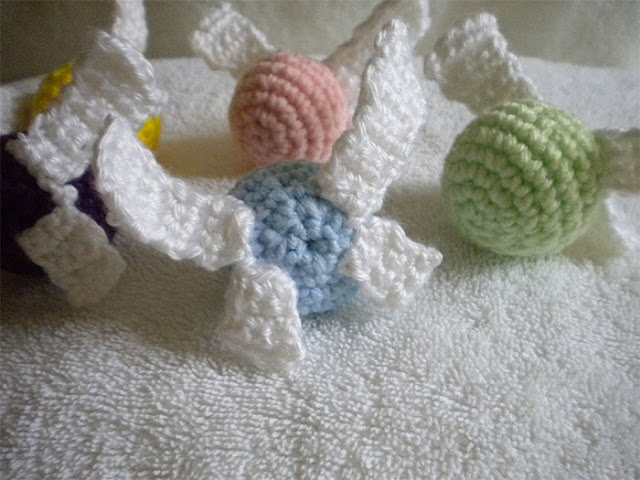
Legend of Zelda Fairies!

I used the Ideal Crochet Sphere pattern, and improvised some wings:

Terms used are American...

Lower Wing:

Row 1 : Chain 4, skip first chain, sc in each chain (*4 sts) ch 1 and turn.
       * I make another stitch right into the slip knot at the end of                the chain...see below pic for detail.


Row 2 : Sc 2 sts, dec, ch 1 and turn. (3 sts)

Row 3-4 : Sc 3, ch 1 and turn. (3 sts)

Row 5 : Sc in each st (3 sts), do not fasten off.  Chain 4 and turn.                This is where the upper wing begins.

Upper Wing:

Row 1: Skipping first chain, sc in each chain st (3 sts), ch 1 and turn.

Rows 2-4 : Sc in each st, ch 1 and turn. (3 sts)

Row 5 : Sc in first 2 sts, inc in last sts. Ch 1 and turn. (4 sts)

Rows 6-7 : Sc 4 sts. Ch 1 and turn. (4  sts)

Row 8 : Sl st in the first st, sc in next st, hdc in next st, and 2 hdc in            last st.  Fasten off, leaving a long enough tail to weave down              through wing and sew to ball, arranging wings around the second          to last round of sphere.  See below pic for detail.


I used Caron's Simply Soft in White for the wings.  And for Navi, I used some unknown acrylic in light blue from the stash, unknown pink for the life fairy, I Love this Yarn in #789-Pistache for the interest targeting fairy, Red Heart Super Saver Solids in Bright Yellow for Tatl, and I Love this Yarn in #294-Mixed Berry for Tael.


Wednesday, March 20, 2013

Blessed Ostara

May your dreams incubate into something wonderful!


And this just in...snow forcasted for our area...3-8 inches.  We'll see.

Tuesday, March 19, 2013

Growing

It's been a little less than a week since the girls came home, and already they're so big...


Say...I heard there was treats...where are they?


You're not holding out on me are you?  Are they on the floor?


Alright!  Here's the good stuff!

In the next few weeks, we'll move their coop/tractor thing around the yard and think about putting them out for a few minutes a day.  But not this week!  Already, the weatherman taunts us with the possibility of snow later in the week! In March! WTH? Madness, madness I say.

At least I have this to content myself with should the snow really decide to fly here:


Sunday, March 17, 2013

Assorted mish-mash

The chicks had a restless night last night...they peeped and peeped at the thunder and lightning, so none of us got much rest.

I've been noticing that one chick in particular has been trying to perch on just about everything in their brooder...mostly their waterer.  So I dashed out in the rain to pick up some twigs for her to practice on.


Notice this little girl, fast asleep on her feet with her head on the twigs for support.  Not exactly what I had in mind! LOL

She's probably the friendliest of the girls right now...


Not really sure what breed she is...she came from the rainbow layer bin.  Can't wait to see her all grown up.

Been looking through our seeds...now to find the starter trays...I know they're here somewhere! LOL


We've had some nice rains, so the earth should be soft enough to try and prepare for all these guys.

I also finished another ami--a depiction of my AD and D character, Stig.


He's pretty much like Bechin's pattern...with a few different mods.  More on that later.

Thursday, March 14, 2013

A good day

it was!

I can't say I don't feel a tiny twinge about getting a bit older.  But it really was a good day!

Lookie!


I found some pretty new dice!

And Don got me some new peeps!


This time it really is an assortment--2 Rainbow Layers, 2 Ameraucanas (though once again, I think they're really Easter Eggers), and 2 Salmon Faverolles.  The Faverolles are going to be nail biters: are they or aren't they pullets?

And best of all...Chinese for dinner and this:


Mom and Don did a beautiful job, no?

Tuesday, March 12, 2013

What to take when going to R'lyeh

The Dice Bag of Doom--it is finished.  Behold it's wondrous appearance:

Ready to play!


*More pics in his native habitat--

Eye sees you!

And you!

Check out the awesome dice!

Do you have monster manual envy, yet?


I used Green Mountain Spinnery's Mountain Mohair  in Maritime and 2 different dye lots of Moss.  There's just enough variance to be able to spot the different lots. :)

The pattern was easy to do...and I did, like a lot of others on Ravelry, increase the size of the bag.  72 stitches...my gauge...5.5 sts per inch, for a bag approximately 7 inches tall x 5 inches in diameter.

I cast on via the lighter circular beginning from Eunnie Jang's lace tutorial.  Then I increased, as I said, to 72 stitches...then did the ribbing pattern for about 16 rounds, placing the stitches on a spare needle for quick access.


Here's some old pics that I took as I went along...

Here's the stitches picked up and a few rounds knitted.
I chose not to knit a whole new bag, as per pattern, but picked up stitches behind the work and continued on, instead.   I skipped a few stitches here and there as I worked and had 60 stitches after picking up.  Then I knitted 12 rounds.  

My decreases didn't work out evenly, as I guessed on the fly (Yes, yes, math was, and apparently still is,  not my strong suit.) and I ended with 52 stitches.


See it?  It's in the upper needle.


You can just make out the crack forming in my #2 needles above, so I had to go to DPN's at this point. So I arranged 13 stitches per 4 needles, and knit 3 more rounds.  Decrease again...k 11, k2tog...48 stitches. K one round. Do eyelet round.  K 2 rounds.  Increase by 4 stitches total over 6 rounds.  I knit 5 more rounds and then bound off.  Most Ravelers used an i-cord bind off...but I crocheted some crab stitch over the cast off edge. 


It's not too clear, but the eyelets are there :)
Crab stich makes a nice hybrid between picots and i-cord


After that, it was all about the tentacles.  Essentially, make i-cord tentacles until you can't take it anymore. LOL For me, that was about 17, ranging in size from 3 stitches, all the way up to 6 stitches.  I probably knitted them a bit too long, but they turned out okay, I think.


You can see the difference in dye lots

From there, I arranged those tentacles, tacked them into place, and added 8, 15 mm yellow animal safety eyes.  I clipped off the part of the posts that protruded from the backs, so no one would get scratched reaching in.  The lining helped with that, too.

Here it is, tentacles sewn, eyes placed, but unlined


Oh, the lining?  Just a tube of fabric with a bottom, hemmed, and hand tacked in place right above the pick up line.  Too bad the camera wouldn't cooperate...so only little pics to share :( 


All tacked in
So this really was a fun knit, even though I whined some (Well a lot.  I-cord is boring. LOL ) about the i-cord.  I wasn't sure about the blue yarn...but I think it really adds to the effect.  I had chosen a black yarn, some Lamb's Pride Worsted that was in my stash along with the mossy Mountain Mohair.  Definitely not the same weight, and it showed.   But the blue is evocative of His briny home...and we like to keep our Elder Gods happy.


*Field photography by the recipient! :)


Monday, March 11, 2013

*No sore feet here...

Mushishi is one of my favorite animes...so naturally, I wanted to try and create an amigurumi version.

Ginko out a-wandering
                                                                                                                                                                        
Ginko-san, the mushi-shi, travels from place to place, curing people who have been infected with mushi, and otherwise trying to bring them (the mushi) into balance.  I really love the artwork and the story telling of this anime! 


  It was a lot of fun dreaming up this pint sized version of him!  


So...onto the good stuff:

I had found a really cool pattern for Link, of Zelda fame.  He is soooo cute, but the reason I am so agog is the ball jointed head that allows for much better posing.  Thanks so much, Tanoushimo, for translating Becchin's べっちん pattern!  If you're interested in making a Link, check out All About Ami's patterns for his shield, sword, sheath, and redesigned hat.


I did make quite a few changes of my own to make Ginko...most notably redesigning the shoe/leg. and redoing the arms, and hair:

I reverse engineered the leg by starting with the sole...same number of stitches and rounds, however after increasing to the 16 stitches, I did one more round in the BLO for a turning round.  Then decreased at the front of the foot (just like the boot top, but backwards ;) ), changing yarn colors on the second round after the BLO round.  I did the same number of rounds...though he does look a bit leggier than Link.  

For the arms: I started the hand just like the pattern directs...but I simply changed yarn colors when I thought his forearms were long enough...then crocheted with sleeve color until I was satisfied with the length.  When I finished that...I went back and surfaced crocheted a row of slip stitches along the place where the two colors meet. That way, he looks like he's rolled up his sleeves.

Oh, and don't forget to add a collar.  I did this one by surface single crocheting it in place, leaving a gap in the front for the collar to be open.

I made a wig cap like the pattern directs, but I used a much smaller hook (1.85 mm or #3 steel, for hte hair, 2.25 mm or #0 steel) as the Caron Simply Soft is much thinner.  As I approached the outer diameter that would cover the top of his head, I crocheted wisps of hair to make his bangs.  Ginko hides his left eye beneath copious bangs.  To do bangs like that, just crochet a chain as long as the desired wisp, then slip stitch back to the wig cap.  I just kind of winged how they should look...but anyways...you get the picture.  On the following round, place a few more wisps to create a really layered look.  For the back of his hair, I single crocheted back and forth matching the width from ear to ear, 2sc tog at each end to taper his nape. After sewing the wig to his head,  embroider around the nape to hid the edges of the wig. I then made one big clump (?) of hair to hide the last gap that I couldn't get covered with the wispier bangs, and sewed that in place.  Done!


Ginko-san hardly ever goes anywhere with out his medicine chest...so I cobbled one together:

Chain desired height of box (I think it was around 10 or 11chains), skip first chain, sc back. ch 1, single crochet row.  Fasten off.

Repeat previous, but don't fasten off.  Instead, chain 1 and work single crochets, through the back loops adding 2 or 3 extra sc at the corners of the box.  Crochet another round.  Fasten off, and sew one box top to other half, stuffing before closing completely.  Straps are crocheted chains...just pull up a loop on one end, and crochet a chain as long as the box...don't leave extra as the chain will stretch enough. Fasten off and repeat for second strap.


I didn't have any green animal eyes (you know, the one's with the pupils), just some really old (back when there used to be Ben Franklin's) 9mm, clear red ones...and being rather impatient, I decided I would just paint on the green irises myself.  From the front.  Yeah.  I really think next time, I'll just wait for eyes to come in the mail.  Though it's super annoying to live in a town this size (100,000+) and no one sells them?!!?  Ahem...anyways.  Like I said, Ginko hides his left eye because there isn't one...he lost it when he was a boy.  So I used a plain black 9mm eye for the hole.  

* The opening music is "The Sore Feet Song" by Ally Kerr.